Tuesday, March 13, 2012

Almond Meal Banana Bread


I decided to buy some Honneyville Almond Flour.  I had been reading about it for several years. I have been using some almond flour from a local source and it worked OK but I wondered if Honeyville's would be better.  I am happy to report that it was better.  It's a finer grind of the almonds which makes a much nicer textured bread.  

I had a few banana's that were very past their prime so I set out to make a banana bread that was free of grains and sugar.  It turned out well and my family even liked it.  That's an accomplishment.  My children have entered another picky phase.  My goal is to greatly reduce the grains and sugars in their diets over the next few months.  After attending a conference with the Institute for Integrative Nutrition a week ago, I was once again reminded how dangerous continual spikes in insulin can be.  It contributes to insulin resistance and diabetes.  I don't want to take that risk with them.

Almond Meal Banana Bread

3 cups blanched almond flour
1/2 tsp sea salt
1 1/2 tsp baking soda
1/2 cup xylitol

Mix together in a large bowl.

2 tsp vanilla extract
3 eggs
2 Tbs oil
4 very ripe bananas (mashed)

Blend well and add to the flour mixture.  Mix wet and dry ingredients together until a cake batter like consistency.  

Preheat the oven to 350 degrees.  Pour batter into a greased loaf pan.  Bake for 45 mins or until the toothpick comes out clean when poked in the center.  

** If the bread gets too brown on top before the center is done, tent the pan with tin foil to slow the browning process down.  

Wednesday, February 29, 2012

Pumpkin Baked Oatmeal


I have been craving baked oatmeal and it had to be with pumpkin.  So I whipped up this batch of pumpkin baked oatmeal.  It was so good.  I love warm breakfasts on cold days and oatmeal really stays with me and keeps me from getting hungry.

So here is my recipe.  I hope you enjoy it!

3 Cups Bob's Red Mill Gluten Free Oats
3 Free Range Eggs
1 Cup Milk
3/4 Cup Xylitol (can also use Palm Sugar or Brown Sugar)
3/4 Cup Pumpkin Puree
1 tsp Vanilla
1 tsp Baking Powder
2 tsp Cinnamon
2 tsp Pumpkin Pie Spice

Grease the sides of a deep bread pan with butter and preheat the oven to 350 degrees.

Mix eggs, milk, and vanilla until eggs are well beaten.  
Add "sugar", cinnamon and pumpkin pie spice and pumpkin puree.  Mix well.  Add oats and baking powder.

Place in bread pan and bake for 40 minutes or until center is cooked through.  Slice and enjoy warm with butter, maple syrup or honey.

Thursday, March 10, 2011

Gluten Free Cinnamon Carrot Zucchini Muffins


Gluten Free Cinnamon Carrot Zucchini Muffins

Ingredients:


•2/3 c oil


•2 large free range eggs


•2/3 c organic sugar


•1/2 c brown sugar, packed


•1 tsp vanilla extract


•2 c Pamela's GF Bread Mix (or other GF Flour Mix)


•1/2 tsp baking soda


•1/2 tsp baking powder


•1/2 tsp unrefined salt


•2 tsp ground cinnamon


•1 1/2 c finely shredded unpeeled zucchini


•1/2 c finely shredded carrot


Preparation:


Grease and flour 12 muffin cups. Heat oven to 375°.


In a mixing bowl, beat the oil with eggs, sugars, and vanilla extract.


Combine the flour, soda, baking powder, salt and cinnamon; add to the wet ingredients; stirring until blended. Fold in the shredded zucchini and carrots.

Fill muffin cups about 3/4 full; sprinkle with cinnamon sugar or granulated sugar, if desired. Bake for 20-30 minutes.

Printer Friendly Version

Sunday, February 27, 2011

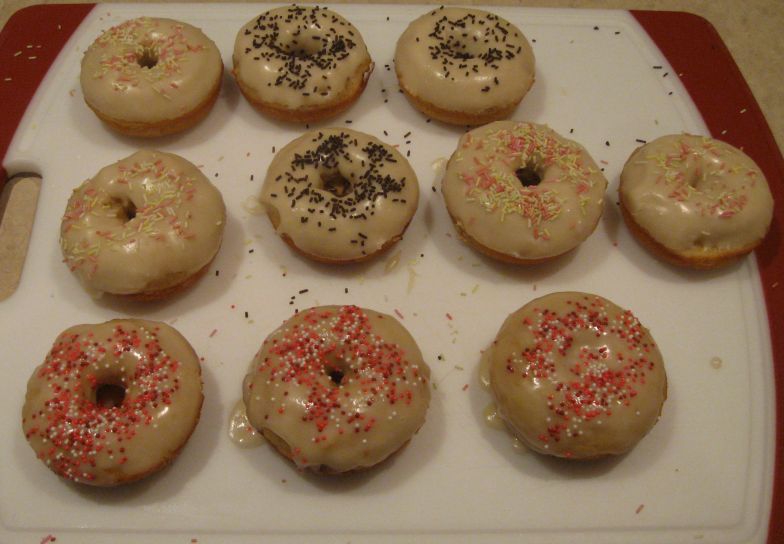
Gluten Free Frosted Cake Donuts


Gluten Free Frosted Cake Donuts

My children are singing the "Mom Praises" here in my home.  With each victory in creating a new gluten free equivalent of the food they used to enjoy, it gets easier to stick with the gluten free lifestyle.  As I was shopping in Meijer's one day I spotted an endcap with donut making supplies.  Included in this was a large donut making pan from Wilton.  I had a little one a long time ago but was unsuccessful in making donuts that weren't dry and hard. 

So here's the recipe adapted from the recipe on the pan package:

2 cups Gluten Free Cake Flour
3/4 cup organic cane sugar
2 tsp baking powder
1/8 tsp nutmeg
1 tsp cinnamon
1 tsp salt
3/4 cup buttermilk
2 eggs, lightly beaten
2 Tbs melted butter

Preheat the oven to 425 degrees.  Spray the donut pan with a nonstick spray.

In a large mixing bowl, mix flour, sugar, baking powder, nutmeg, cinnamon and salt.  Add in buttermilk, eggs and butter.  Beat until combined.  Fill each donut cup 2/3 full.

Bake for approx 8 mins or until the top of the donuts spring back when touched.  Let cool 4-5 minutes before removing from the pan.  Makes 12 donuts.

For the frosting / glaze:

Melt 1/3 cup butter in a sauce pan.  Remove from heat and add 2 cups powdered sugar, 1 1/2 tsp vanilla and stir.  Add 1 Tbs of water at a time until the consistency desired is achieved.  Dip the donuts upside down in the frosting until coated and sprinkle with decorative toppings if desired.


Enjoy the yummy donuts with a cup of coffee or hot chocolate.

To your health,
Dr Stephanie

Thursday, February 10, 2011

Gluten Free Peanut Butter Cookies

It's been a long time since I posted an entry.  The reason?  I have been working on finishing my Doctorate in Naturopathy.  I am happy to report that I am officially done!  So now I can return to the kitchen to bake some treats for my family. 

The request this week was for peanut butter cookies.  I have made the the flourless kind and they are good but these are better!  Today my children had Hot Chocolate made with raw milk and organic chocolate and warm peanut butter cookies.


1/2 Cup Organic Cane Sugar
1/2 Cup Organic Brown Sugar
1/2 Cup Organic Butter, room temperature
1/2 Cup Organic Peanut Butter (creamy)
1 Free Range Egg
1 1/4 Cup Gluten Free Flour Mix
1 tsp Xanthan Gum
3/4 tsp Baking Soda
1/2 tsp Baking Powder
1/4 tsp Salt

Cream the butter with sugars, and egg.  Add the peanut butter to the mixture and blend well.  In a separate bowl combine all the dry ingredients and mix well.  Slowly add the flour to the butter mixture and blend until a play dough like consistency. 

Preheat oven to 375 degrees.

Roll the dough into 1 1/4 inch balls.  Place on an ungreased baking sheet about 3-4 inches apart. 

Bake for 9-10 mins.  Cool on the baking sheets for a minute and then transfer to cooling rack. 

Makes 2 dozen cookies (depending on size)

Print View

Enjoy and be well,

Dr. Stephanie

Friday, June 4, 2010

Gluten Free Cheese Ravioli for Lunch


We tried a new product in our lunches.  Gluten Free Ravioli.  It was really good.  I added some sauce and put it in a thermos for them. 


This is their lunch.  Cheese Ravioli, Cashews, Strawberries, Cinnamon Muffin and a peanut butter thumbprint cookie for snack time.


And here it is all packed and ready to go.

Enjoy Life's New Allergen Suvival Guide

I just received a Facebook post from Enjoy life with a link to their online Allergen Survival Guide.  It's a great tool to use for people new to this lifestyle as well as for family trying to integrate their food choices with your needs. 

Enjoy Life Allergen Survival Guide

To your health... Gluten Free

Stephanie

Wednesday, June 2, 2010

King Arthur Flour Gluten Free Pizza Crust


I received an e-mail from King Arthur Flour that showed beautiful images of a gluten free pizza crust recipe.  It looked so good!  So I decided to make it for supper last night since it was just the kids and I for dinner.  I have included images of my outcome.  We used a 12 in pizza pan.  If I make this again I will use less dough.  The dough was extremely crispy and with it being so thick it was difficult to cut through and chew.  I think thin and crispy would have been perfect.  But the texture was great.  I don't have access to King Arthur Flour here in Michigan so I used their flour mixture recipe.

If you are interested in trying this recipe here is a link to the King Arthur Blog where you can find all the details.  This recipe is egg free but not dairy free.


Thursday, May 27, 2010

School Lunches


I thought I would share a quick post about school lunches. This is one thing I really hate making. Especially this time of year. It's hot and the kids don't feel like eating a lot. So here is today's *menu*. We use the Bento Laptop Lunch system. We also have the Bento Buddies. The lunch on the left is my son's. His lunch includes strawberries/blueberries, trail mix, applesauce spice bread, pretzels and a cheese stick. My daughter's lunch has strawberries/blueberries, honey roasted peanuts, buttered gluten free applesauce spice bread and cheese cubes.
The Applesauce bread is from Paula Deen and I used Pamela's Baking & Pancake Mix flour blend for the flour. It turned out really good!! Very moist.
And now it's time to start breakfast. I think we will have pancakes.
To your health.....gluten free.
Stephanie


Tuesday, May 25, 2010

What a GF Warehouse looks like....

I posted in my last blog entry that I kept a warehouse of stuff on hand. I wasn't kidding and just to prove it I thought I would share some pictures now that my DH organized them after a family member did a Trader Joes run for me yesterday. Now when our garden gets going all I will have to buy is meat at the butcher, pick up our milk at the farm, fruit from the farmers market and run to the health food store for eggs. I love the summer months!

Ok, so call me nuts..... but groceries are taken care of for a few months now. With the kiddo's home that is the last thing I want to have to do with them. :)


Sunday, May 23, 2010

Gluten Free on a Budget

"How can I afford to go gluten free?" is the lament I often hear. So day after day goes by and the people who need to remove gluten from their lives the most, hedge bets that things will be OK even though that still small voice inside of them tells them...... It's time. So today's post is for all the people who struggle with budgets for food, for feeding a family of fussy children that only want cereal and PBJ's. There is life after gluten.

I went on a gluten free diet in 2004. I remember the day that the decision was made all too well. I had been at my ND's office and we were discussing my health and diet after cancer treatments. I continued to struggle with gut related problems. I took probiotics and had done a liver cleanse yet there was that underlying issue.....always present. I returned home already stressed out by the cost of medical care wondering how would I work my new diet into the family diet and then there was the budget - OH BOY! I sat at my computer screen and cried as I searched for options. How would I feed my family? Two seperate meals? Then you get sticker shock just walking into the healthfood store and perusing the GF section. $5 - 8 or more is the standard cost of a single mix item. The discouraging thing was that they didn't even taste that great either. Half the time the mixes didn't turn out well and I didn't eat them and threw them away when they were stale. So how was this helping my budget?

This is my basic flour mixture. I use it for all my cookies. There are 12 cups in this batch and each bag I buy at the Asian supermarket for .99 cents / bag. The 1 lb bags have 4 cups of flour in them so the cost to put this together is $3.00.

My toll house cookie recipe uses 2 1/4 cups. That's 19% of the total container or .57 cents for flour for cookies. Add your normal chocolate chips (Aldi's are $1.19 / bag), butter (Aldi's $1.99 4 sticks - 2 sticks in recipe $1) and a few misc items like salt, baking soda and xanthan gum (more on where to get a deal later) and for about $3.00 you have a large batch of gluten free chocolate chip cookies. Cheaper than Oreo's and better for you!

This is my basic cookie flour:

9 Cups White Rice Flour
2 Cups Potato Starch
1 Cup Tapioca Starch / Flour

If you have a Trader Joe's near you, pasta is covered. $1.99 / bag for penne, spiral and spaghetti pasta. We make the *pilgrimage* 2x year 2 1/2 hours to our closes Trader Joe's to stock up. My basement looks like a warehouse.

But if you don't have a Trader Joe's the best way to find cheap pasta is to watch Amazon.com and buy it by the case. I use Subscribe and Save whenever possible. This will give you an additional discount. Don't be scared to sign up your first time. You can always cancel before the next shipment if you don't like it or if you get to the point of shipment and don't need more. I have purchased bags on sale for $1.50 - $3.00 depending on the sale. Once you start buying gluten free on Amazon they will start to e-mail you with specials.

For times that you need something in between sales I have found that Vitacost.com and iHerb.com offer some decent prices.

Xanthan Gum - if you aren't a huge baker this container will work well for you NOW 6 oz for $6.87 at
iherb.com and if you bake a lot like I do you will want the industrial size you'll want to check eBay. I just scanned it today and the best prices is $9.99 with $4.97 shipping for 2 lbs. That's about 50% less than through iHerb.

The next flour blend I make is like a pastry flour. It can be used for muffins, cakes and any other

Gluten Free Cake Flour Mix

3 Cups Brown Rice Flour
1 Cup Potato Starch (not potato flour)
1/2 Cup Tapioca Flour
1 1/2 tsp guar gum or xanthan gum


Once again the potato starch and tapioca starch can be purchased at your local Asian grocer for about .99 cents / 4 cup bag. The brown rice is a bit more difficult to get. I have started to grind my own from brown rice in my BlendTec but prior to that I purchased it from
Country Life which is local to me - but does ship UPS. I would recommend finding a local Weston Price group. They are a wealth of resources since they advocate baking and cooking from scratch.

Now for your challenge. I will follow up this blog post with more information on changing to gluten free but I need your help. I want you to submit your normal meal plan for a day and I will try to convert it with options that are gluten free and if possible include a cost to make themm. Just e-mail me
here.

Until then. Here's to living gluten free.

Stephanie

Friday, April 30, 2010

Make Your Own Coconut Milk


I saw a video on Tropical Traditions website and then saw a blog post on Elana's pantry blog site about making your own coconut milk. I had purchased a very large bag of shredded coconut and needed to find a use for it. So I figured what did I have to lose. It looked easy enough. So here's what I did.


Tools Needed:

1 - Blender - I used a Blendtec (purchased a demo unit on eBay for under $300)
1 - Cheese cloth - (Bed Bath & Beyond )
1 - 1/2 gallon mason jar with lid
1 - Funnel for a wide mouth jar.
8 - cups filtered water
6 - cups shredded coconut


Heat up water to a very warm temp. I did my blending / straining in several smaller batches - about 2 cups at a time to 3 cups of water so my water amount is an estimate. There isn't a right or wrong way just try to keep about 2 parts coconut to 1 part water.
  1. Place the water and coconut in the blender and blend until very smooth.
  2. Place the mixture in the cheese cloth and twist the top of the cloth and squeeze the liquid out of it.
  3. Put the pulp back in the blender jar with another 1 - 1/2 cups of very warm water, blend and squeeze out the liquid. After this round discard the pulp.
  4. Repeat the steps above with more fresh coconut and water.

I added a little vanilla and sweetener to my coconut milk (to taste)
The milk is great to drink immediately but you will probably want to put it over ice. I put the jar in the refrigerator and the next morning it had separated - there was a large layer of coconut cream. This thrilled me because I love this part the best in the canned coconut. I put it on top of warm oatmeal.


To get it back to the milk return it to the blender and lightly blend. Don't blend too long or it will whip up like whipped cream and become very thick.
Enjoy!


Tuesday, April 27, 2010

Gluten Free Walrus Bread


What on earth is Walrus Bread you ask? Well, I didn't know. I only knew that I found it on Bob's Red Mill site and that it had garbanzo bean flour which I have an over abundance of. So I figured - why not?
I didn't finish this blog entry the other day because my computer locked up and the only thing it would let me do is publish the blog entry. So now I am adding the picture and will comment that this bread tasted really good, rose well but when it was done backing I had this funny very high, weird shaped bread. Not sure what causes this. But I will be trying this again. I like that there is protein instead of starch as the main ingredient.


Ingredients
1 cup Garbanzo Bean Flour
1-1/2 cups White or Brown Rice Flour
1/2 cup cornstarch or potato starch
3 tsp Xanthan Gum
1 tsp Salt
2 Tb Sugar
1 Tb Yeast, Active Dry
2 Eggs, room temperature
2 Tb Vegetable Oil
1-3/4 cups Water, room temperature
1 tsp. Vinegar, room temperature


Directions (for oven instructions click on the link above to BRM site)
In a large bowl mix the first 7 ingredients together (garbanzo bean flour through yeast).

In another bowl blend together the water, eggs, oil and vinegar. Add wet ingredients to the dry mixture; blend well. Spoon bread dough into the breadmaker bucket.

Set control for basic white bread and start.
Finished loaf should be about 5 inches high.
Yield: 1-1/2 lb. loaf

Number of Servings: 12

Nutritional Info
Servings Per Recipe: 12
Amount Per Serving
Calories: 175.0
Total Fat: 4.3 g
Cholesterol: 35.4 mg
Sodium: 226.4 mg
Total Carbs: 29.3 g
Dietary Fiber: 3.6 g
Protein: 4.8 g

Friday, March 26, 2010

Vanilla Cupcakes - Allergy Free


These are AMAZING....was the comment my daughter made when she saw me putting the final frosting and sprinkles on the top. The recipe is from the Allergen Free Baker's Handbook. I just sampled 1/2 of one. It was as my daughter said..... AMAZING. She will be taking one to her friend's birthday party tomorrow.


Friday, March 19, 2010

Allergen-Free Baker's Handbook Snickerdoodles

Today I tried another recipe in my new cookbook The Allergen-Free Baker's Handbook (below). This is an absolutely fabulous cookbook! No nuts, eggs, dairy or gluten.

I have made the Classic Coffee Cake, Cherry Scones and now the Snickerdoodles. My children will be thrilled when they get home from school. They love cinnamon sugar and these fit the bill. If you are trying to stock your library with cookbooks that work and have yummy recipes this is a must!

To your health..... Gluten Free!

Stephanie

Wednesday, March 17, 2010

Gluten Free Oat and Flax Bread


This is the very best bread yet! You would never ever, ever know this is not a wheat bread. I was playing around with some ingredients and came up with this bread. It's fun to be able to work without recipes and come up with things that have the ingredients you want.

Try this one! You won't be sorry.


In a large mixer bowl add the following ingredients together. Just dump them all in at once - that's why this is so easy!

1 Cup Brown Rice Flour
1 Cup White Rice Flour
3/4 Cup Oat Flour
1/4 Cup Tapioca Flour / Starch
1/4 Cup Ground Flax Meal
3 Tsp Xanthan Gum

1/2 Cup Milk (warm)
1 1/4 Cup Warm Water
2 Eggs
2 Tbs Sugar
3 1/2 tsp Yeast
1/2 tsp Celtic Salt
2 Tbs Oil

Place the batter in a greased bread pan and let rise in a warm place for 1 hour. It should be rounded above the top of the rim of the pan. The bread will not rise too much higher when baking.


Preheat the oven to 365 degrees. You will bake this bread for 60 minutes total. Tent the bread with foil for 50 mins. In the last 10 minute remove the tin foil and let the top brown.

Printer Friendly Version

Enjoy!

Stephanie

Wednesday, February 24, 2010

Gluten Free Lemon and Almond Meltaways

I love Facebook! It allows me to be connected to places I never knew existed. One new link surfaced today.

This is a recipe I will be trying soon. My family loves lemon!

Gluten Free Lemon and Almond Meltaways

Tuesday, February 23, 2010

Best Gluten & Dairy Free Sandwich Bread Yet


This is absolutely the best gluten free and dairy free sandwich bread I have made yet. I was playing around with various grains I had in my pantry and came up with this mixture. It rose nicely and had a great consistency. My daughter said "This is definitely an improvement." So this recipe is a keeper. I thought I would share with those of you struggling to make a good bread. It's super easy too - especially with a KitchenAid Stand Mixer.


Best Gluten & Dairy Free Bread
1 1/2 Cups White Fine Grind Rice Flour (I get mine at the Asian Food store)
1 Cup Brown Rice Flour
1/2 Cup Sorghum Flour
3 1/2 tsp Xanthan Gum
1 tsp Salt
1 Tbs Sugar
2 1/2 tsp Dry Active Yeast
Wet Ingredients
3 Eggs
1 3/4 Cup Warm Water (about 110 degrees)
Preheat oven to 175 degrees and turn off immediately when it reaches the temperature.
Mix all ingredients together in a stand mixer and let it blend for 3 mins. on medium high. Pour batter into a greased large loaf pan. Let rise in the warmed oven for 30-45 mins or until the batter is just above the top of the pan.
Heat oven to 375 degrees. Take a piece of foil and "tent" it over the top of the bread for the first 45 mins. In the last 15 mins of baking (total of 60 minutes baking time) remove the foil so that the top of the bread can brown. My experience has been that my bread gets too dark and dries out if not covered for 3/4 of the baking time.
Remove from oven and cool. Slice and enjoy!
To your health.....gluten free!
Stephanie

Monday, February 1, 2010

Oatmeal Maple Gluten Free Bread - Living Without


I love making new breads and this one is no exception. It tasted so good. The oats really made the bread have a not so gluten free taste. I recommend this. It makes a very dense and flavorful bread. I did not use Maple Syrup. I used Agave Nectar.

Here is the recipe from the Living Without Magazine - Oatmeal Maple Gluten Free Bread.


Saturday, January 23, 2010

Cherry Oat Scones - Allergy Free


I found a video of Cybele Pascal making Cherry Oat Scones and they looked easy enough to make. Wow where they good. They were easy so don't be scared of trying them. I shared them with others and they have raved about them too. You can watch the video here on Amazon.com .